|
| Note from
GuitarAttack: This is a cool LP. Lots of great techniques.
Remember: These Saga guitars have a near bullet-proof clear
sealer coat on them!. From Derrick Cape
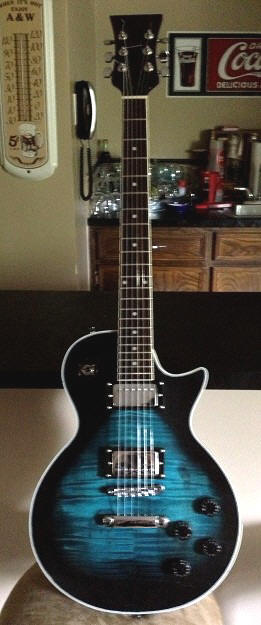
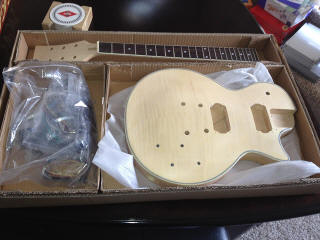
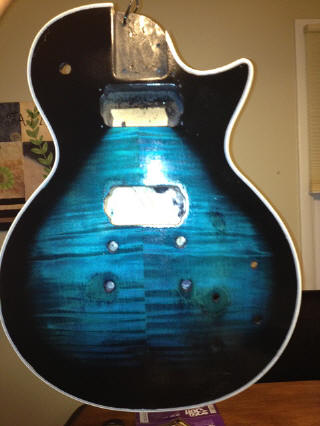
A SAGA Les Paul My name is Derrick Cape, I was just learning the guitar and thought it would be a good idea to build a SAGA LP to further my understanding of a guitar. This was about a year ago. Prior to receiving the SAGA I did A LOT of research trying to determine what I wanted it to look like when it was finished and also to find out some techniques that would help me. Needless to say, since the SAGA LP comes with a flamed maple top, I chose to do a blue/green flamed maple top. I bought some alkaline dye off of Amazon for roughly $15, I am not 100% positive because it was a while ago, one Blue/Green, one Black (for the highlights). Using alkaline dye turned out to be much harder than I thought. What I did not know beginning the staining process was that the SAGA’s are SEALED! Yes, I tried staining it, let it sit for a few hours, came back and it all wiped off. So unfortunately I had to spend hours upon hours lightly sanding with fine grit sand paper. In my frustration and impatience I used a small power sander to finish it. Eventually the sanding was finished. |
 |
|
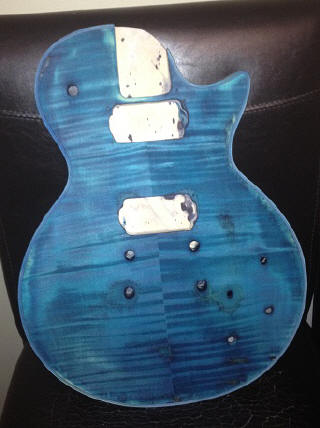
Next came the staining, I used the black alkaline die to start off. Once a good coat was applied I let it dry for a few hours and came back to sand it. I probably let it sit and soak for too long because I had to sand quite a bit off so it would just show the tiger striping in the maple, I eventually sanded through the veneer in a few spots. O well... Then I applied a generous amount of the blue/green dye to the body. I let it dry and gave it another VERY LIGHT sanding to bring out the blackened tiger stripes from the black dye. |
 |
|
After I was pleased (with the exception of the sand throughs) I taped off the top, the binding, and the fretboard and sprayed a few layers of Black automotive spray paint. I hung them up to dry with metal coat hangers in-between the 3 coats of paint for about 48 hours to let the paint cure. |
 |
|
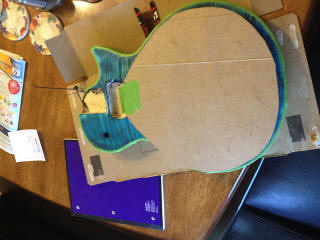
Next I took all the taping off to see my almost finished work of art. I hated it! I could not stand the few sand throughs, it’s like every time I looked at it they started screaming at me! So I decided to cover them up with a blue/green to black burst. I cut a template from some cardboard and used some thumbtacks to keep the template about ˝ inch about the body. Then I used the black auto paint to finish the burst.
|
 |
|
Then I used some glossy auto acrylic lacquer, about 6-7 coats to give it that nice shiny look. Once all that was dried and cured, I put the guitar together. It all went together pretty smoothly, I would guestimate it took me about 2 ˝ hours to put together, and I was a complete noob!
|
|
| I was quite happy with the
finished product, it sounds pretty good and it looked pretty good, the
flamed maple even had the same 3d effect that a flamed maple guitar would
have from a store. My advice would be to do lots of research and don’t be
hasty like me and sand through the veneer.
I'd like to thank my dad Amos for helping me. I couldn't have done it without him! |
|
| Great job, Derrick -- It looks great...how does it sound? Keep on building! | |
| ATTACK HOME | "SAGA SAGAS" MAIN | ||||||||||||||||||||||||||||||||||||||||||||||||||||
|
|||||||||||||||||||||||||||||||||||||||||||||||||||||