|
|
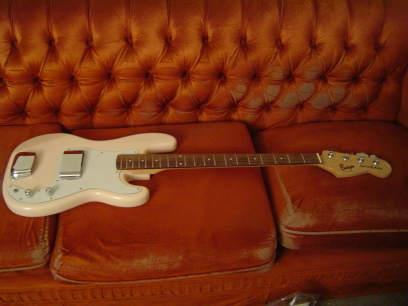
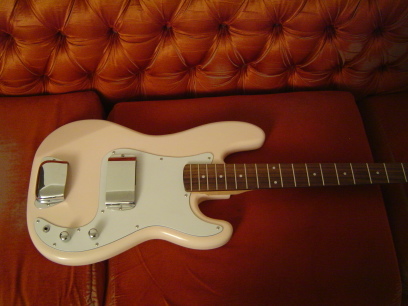
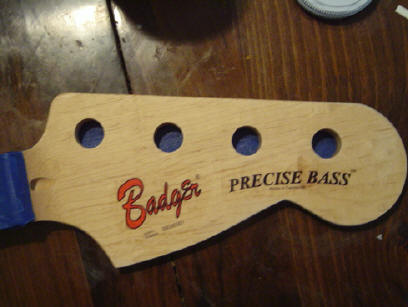
Dear GuitarAttack -- I’ve read and enjoyed the many saga sagas on the GuitarAttack site for a while now and it didn’t occur to me until recently that I should send in a saga of my own. I completed this pink bass about a year ago and completely forgot to send it in to you. Anyway, here’s my Saga Saga: I got this kit for $100 from online guitar. As soon as the delivery man dropped off the kit I followed the advice given by many an experienced saga builder and put the kit together to make sure all the pickguard and tuner holes matched up and that everything fit and worked as it was supposed to. Luckily I didn’t have to fill or re-drill any holes. I didn’t have to do a lot of prep work on the body or neck because I chose to leave the nuke-proof sealer alone. There was a small ding on the body from the shipping process that I filled with an oil-based wood putty. The putty worked well and you can’t even tell where the dent was. Other than that I just did a little light sanding with some 400 grit sandpaper just to make sure I had nice surface to work with. I used Krylon Interior/Exterior paint for the color coats because I wanted to finish this thing on the cheap (I’m a poor starving college student). I wanted a color a little lighter than Fender Shell Pink, and the Krylon equivalent is the very non-manly named “Ballet Slipper Pink.” I used Deft for the clear coats. I used gloss on the body and satin on the neck because I feel like I can slide better with a satin finish. I also used gloss on the headstock because I wanted it to match the body. I made a custom decal for the headstock with some waterslide paper. My last name is Badger and I called it a Precise Bass instead of a Precision Bass because that’s what Aria, who was making knockoff Fenders in the lawsuit era, called their P-Bass replicas. The serial number is #000001 because this was my first build. I wet sanded both the headstock and body and buffed with Finesse It. I swapped out a couple pieces of hardware and added a couple. As you can see, I added bridge and pickup covers. I bought those at a local mom and pop bass guitar store for about $8 each. I think the chrome covers make the whole thing look more snazzy. I swapped out the kit tuners for some Stewart McDonald adjustable tension tuners for about $25. I tossed the cheap knobs out in favor of some nicer heavier ones I had left over from another project. I decided to keep the stock bridge and pickguard as well as the electronics. As for the electronics, I chose not to trust the snap-together wires, so I soldered everything. I shielded the control cavity with some shielding tape I got from StewMac for about $10. That took care of the hum I was hearing during the test fit. I didn’t change out the pickups, jack, or pots but I did swap out the capacitor for one I pulled out of an Asian bass I overhauled a while ago. All told I probably put about $160-$175 into this project for the kit, the hardware, and the finishing supplies. It definitely sounds better than any bass you could buy off the shelf for that amount of money. I’d say it sounds about as good as some (but not all) of the $300-$400 basses I’ve played. The best thing about it is that it’s 100% mine. It has my name on the headstock and I was the one who put all the work into building it. I really enjoyed putting this bass together and I’m currently planning on building a saga strat sometime in the near future. Please note that I took the pictures before I strung the bass up and that the picture of the headstock was taken before clear coats. Also, note my awesome 1970’s couch I picked up at a thrift store for $10. James H.
Badger
|
|
 |
|
 |
|
| Killer Bass...thanks for the submission! | |
| ATTACK HOME | "SAGA SAGAS" MAIN | ||||||||||||||||||||||||||||||||||||||||||||||||||||
|
|||||||||||||||||||||||||||||||||||||||||||||||||||||