From GuitarAttack:
-- Some great tips and advice on patience!
Appreciate the kind words on the video, and we
are glad we could help!
SAGA T-Style Saga
From Rob S.
Hi, I’m Rob and this is my Saga saga.
I bought this TC-10 on Amazon as a “Warehouse Deal.” It was listed as
“used, but acceptable” with “major cosmetic damage, but still useable.” I
decided to take a chance, since it was only around $93. New TC-10s on
Amazon were going for around $167, at the time. The kit came in great
shape, actually.
There were a few minor cracks in the body, but I think they were in that
“bullet proof” finish that Saga puts on. Otherwise, the only thing missing
was the instructions. By the way, if that ever happens to you, go to the
Saga website and use the “Contact Saga” link. You can message them and
tell them what happened and they will email you back the next day. When I
did this, a Saga rep emailed me back and said she’d be glad to mail me a
set of instructions. Now, I’m impatient and decided not to wait for the
snail mail. That impatience also has a lot to do with why my painting and
finishing job SUCKS. Lol!
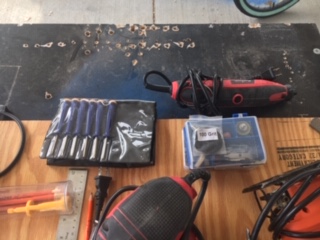
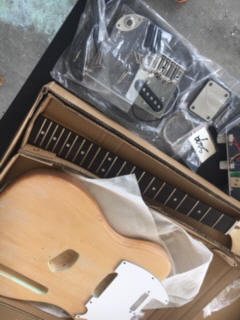
Anyway, I did what you’re supposed to do and laid everything out for an
inventory. I also laid out all of the tools that I would need. I was
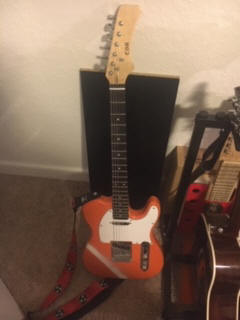
looking to paint the guitar body orange and white as a tribute to the
University of Tennessee because I hail from the “Volunteer State.” I used
“pumpkin orange” so as not to run afoul of any trademarks or copyrights.
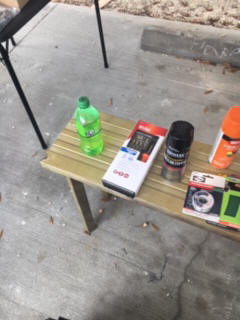
You can see the paint and clear coat in the picture with the sandpaper.
I used varying grits of sandpaper from 80 up to 220 to prep the body. It
had some kind of white chalky stuff on it that I needed to get off. More
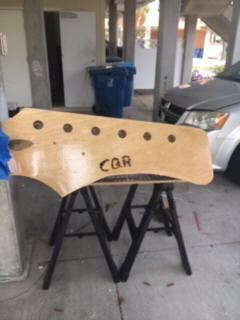
on the body in a bit I just hit the headstock and neck with the clear
coat. I did burn a “logo” into the headstock after I cut out a rough
crescent shape. To do the cutting, I flipped the neck over and used a
pencil to just rough draw a crescent from the tip in the bottom corner to
the tip in the top left (looking at the back of the headstock). Then I
used circular saw attachments on my rotary tool to cut along the line I
drew. When I saw that the rotary tool wasn’t cutting deep enough, I used a
jigsaw to make several relief cuts, then switched back to the rotary tool
to slowly chip away. The cut turned out very rough.
I then used a 180 grit sandpaper disk on my rotary tool to smooth it all
out. It came out with a nice hand-carved look, which I really like. I then
took a wood burning tool for the logo. The “CQR” stands for “Charge of
Quarters Ranger” because I’ve pulled many charge of quarters duties in my
almost 14 years of service in the Army.
Once I got about three coats of the clear coat on, the neck and head were
done until time for assembly. Now, the body. I originally wanted to go for
a finish that would show the wood grain. After looking at the body, what
little grain was there didn’t impress me. So, I decided that I had to go
with a solid finish. I first taped up the neck cavity so as to avoid
getting paint in there. That’s probably the last thing I did correctly on
the finish. I hit the front with Coat #1, gave it 10 minutes, then flipped
it over and hit the back. The big problem is that I was laying it on the
wrapping that it had came in. For some reason, I decided this would be a
nice, clean surface. Yeah, not so much. It stuck to the paint. I hit the
front and back with a couple more thin coats of paint, gave it about 10
minutes to dry to the touch, and then hit it with the clear coat.
I messed up a bit on the back and had to sand down to the wood in a futile
attempt to fix it. Yeah, that didn’t work out too well. So, I painted and
clear coated as best I could and gave it some time (a couple of hours) to
really dry to the touch. Then I got bit by the good idea fairy. I decided
to put a white stripe on it. I masked off all but where I wanted the
stripe with some paper shop towels and then I hit it with a can of old
white spray paint that I had in my storage locker. That turned out
terrible, but serviceable—I suppose. Oh, I also took the tape off the neck
cavity and stuffed a couple of paper towels in there so that I could paint
the areas where the masking tape had been. That actually didn’t turn out
too bad.
I then hit it with a final clear coat and called it a night. The next day,
I figured the finish had dried enough that I could go ahead with assembly.
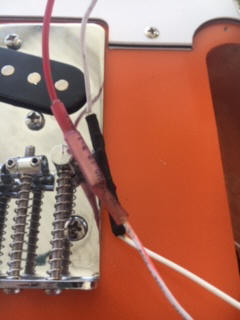
The first thing I did was run all of my wires and clip the connectors
together so I could verify that the electronics work. To verify, I plugged
it into my mini amp and held a screwdriver over each pickup in each
position of the three-way switch. I discovered that I had reversed the
neck and bridge pickups on the switch. Ha! Easy fix. So, I fixed that. I
also tested the knobs to see that they at least turned well. I wouldn’t
really be able to fully test them until I had the strings on.
The next thing I did was to unclip each wire and slide the included heat
shrink insulators on. I did one wire at a time so as to avoid the reversed
wiring from earlier. One of my wires broke right at the connector. That
wasn’t a huge problem. I had some leftover heat shrink wire connectors
from a car stereo installation that I did a couple years ago. So, I cut
the connector off, stripped the wire, and put the new connector on. Bam!
Back in business.
Once I had everything wired and I was good with the functionality, I
screwed in the jack plate, tucked the wires down inside the control
cavity, and screwed down the control plate. Then I made sure the ground
wire had good contact with the bridge and screwed down the bridge. After
that, I attached the pick guard. One of the screws had a tiny piece of
metal inside the cross on the head. Fortunately, I was able to pry that
out, otherwise I would have been down a pick guard screw. Next came the
strap buttons. Easy enough. I then put the string trees on the headstock.
Finally, I was ready to install the tuners. I ended up having to use a
3/8” drill bit to open the tuning peg holes enough to get the ferrules in.
I tapped those home with a rubber mallet. Then I installed the tuners. The
holes on the back of the headstock didn’t quite line up with the holes in
the tuning head housings, but the screws tend to be self tapping, so that
isn’t a huge deal. What did annoy me was how soft the metal in the screws
was. A few of the heads on the screws stripped out a little, but I was
able to get them completely secured. I then mounted the neck to the body.
That was pretty easy.
I put the plate on the back of the body and then put two screws in, one in
an upper corner and one diagonally. I screwed them until they were just
poking out into the neck cavity. I then used that to line up the neck and
I tightened from there and then put the other two screws in. After that, I
strung it up, made my adjustments on the saddles for action and
intonation, and tuned her up. It took a bit to really get her dialed in,
but she’s definitely playable. No, she doesn’t sound like a $1,500 guitar.
She doesn’t even sound like a $300 guitar. But, she’ll do.
Everything, to include the strings is the stock that came with the kit.
I’ll eventually upgrade the strings, and probably the tuning heads. I’m
also thinking about upgrading the bridge and saddles. But, that’s all for
later. I’m going to wrap up this novel, attach some pictures, and enjoy my
new guitar.
V/R,
Rob
UPDATE!
An update to the story. I just put a set of D’Addario light gauge XL
strings on it. Much better in terms of tuning and setting intonation. I
also found that I needed to file the nut down so that I could get better
action on the neck. Otherwise, she remains stock as I received her.
Thanks for the kind words, by the way. I’m enjoying
the site and I loved the video of the strat build. That’s actually what
pushed me over the top on the decision to go with Saga over other kits.
V/R, Rob
|
 |