|
Note from
GuitarAttack: This is pretty unbelievable. OK -- who is
going to try building one like this?
From Greg Hansen
Hi,
Love the guitar attack website - great resource. I'm attaching some pics of
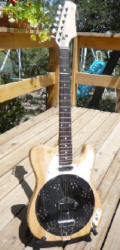
a biscuit cone resonator that I made from a Saga T-Style kit. It sounds even
better than it looks...very happy with it. Keep up the good work!
-Greg Hansen
This all started with me getting tired of lugging two guitars (an electric
and a resonator) to practice and gigs. A National Reso-Electric was out of
the question due to price and some of the cheaper electric resonators out
there were just too ugly or they used a spider bridge and I really like a
biscuit cone sound. So I saw how a some other people had converted Teles
into resonators and I took the plunge. I decided the Saga kit was a better
option than buying a tele and converting it so I picked one up on ebay.
The kit arrived on a Friday afternoon and I started tinkering that evening.
The first thing I did was use a router with a circle cutter to begin to rout
out the cavity where the cone would fit.
Earlier that day I had gone by a local metal shop and asked the fella to cut
a 1/8' thick metal ring that matched the diameter of the cone(9.5'). He
whipped in right out for total of $22. I wanted this ring as a base for two
reasons- too provide a flat surface for the cone (less buzzing)and to create
extra sustain. I think it was a good call because the acoustic tone, volume
and sustain of this guitar turned out way better than I hoped. I used a 2'
forstner bit and a drill press to remove most of the stock. I also
drilled 1' holes for the metal screen plugs I used as sound vents.
I already had an OMI biscuit cone and cover plate and I also ordered a
carbon fiber biscuit bridge with a super slim profile. One of the problems I
had encountered in my research on this conversion was that the standard
resonator bridge sits high on the cone and close to the bridge so string
tension is a problem and it becomes necessary to shim the neck in order to
get the correct angle.
I found a short tail piece and flattened the
right angle at the end to make it even shorter. The OMI coverplate sits on
the body with a much flatter profile and that combined with the short
tailpiece and the slim biscuit, I could keep the bridge at the same height
as a regular electric and didn't have to shim the neck.
I upgraded the tuners and string trees Everything else went together so
smoothly I ended up working though the night, strumming my first chord at
about 4 in the morning. Thrilled with the sound, I christened the guitar 'Dobob'
and crashed.
Over the next few days I made a truss rod adjustment to clear up some
buzzing(it need some bow) and I also decided to replace all of the
electronics. I put in a stacked humbucker, shielded wiring and better pots.
I ended up having to rout a larger cavity for the pots and change the knobs.
I added better string trees and nicer tuners. I also had a custom decal
made.
I decided not to install a transducer pickup and try to blend the sound. I
wanted to keep things simple. If you roll down the treble you get a very
funky reso sound though the neck pick up so I am glad I didnít fiddle around
with it. Iíve had to get used to playing slide with lighter strings and
lower action, but Iím glad to do that to keep with the main goal of a true
hybrid- two guitars in one. This project turned out very well and honestly,
I think I got real lucky at a few key junctures. Iíll credit good fortune
over my skills as a luthier for the success.
|
.JPG) |

.jpg)
(2).jpg)
