| Note from
GuitarAttack: How is this for inventive? From Scott Floyd
comes this interesting take on an LP-style. Thanks Scott, and thanks
for your service.
From
Scott Floyd
Hello. My name is Scott Floyd. I am currently finishing up a 20 year career
in the Marine Corps --18 down 2 to go in fact. I’ve been working a second job
delivering pizza trying to save money to go to the Roberto-Venn Lutherie
School in Phoenix. Hopefully I will be there in the fall of 2010. In the
meantime I thought I should gain a little experience in guitar building.
I have had a lifelong love affair with guitars. I play them, collect them,
rescue them from pawn shops, and basically spend almost every waking moment
thinking about guitars and guitar designs. At first I was going to attempt
to build a guitar from scratch, but after researching the cost of materials
and the amount of time it would take, I decided to order a Saga kit for now.
I had always wanted a Telecaster, but I recently got a great deal on one at
a thrift store. Ace Frehley was my very first guitar hero, so a Les Paul
seemed like the obvious choice.
I ordered my Saga kit directly from Amazon.com through a third party company
called 8th Street Music. I ordered it on a Thursday and it was on my
doorstep Saturday, and that was using normal delivery rates! I was as
shocked as I was pleased at how fast it arrived.
I have read on this site the many trials of removing the sealer from these
guitars. The instructions in the Saga kit said the body was ready for paint
immediately and no primer was needed. I decided to go with the instructions
in the Saga kit and get started.
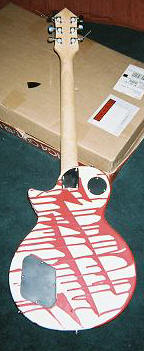
After doing an inventory, I decided cutting the headstock should be the
first step. I am a big fan of BC Rich guitars and thought about doing a
‘widow’ headstock, but I was limited to a coping saw. I think the design I
picked is pretty cool. It is simple yet effective. Not having access to even
a vice, I cut my headstock in a pretty unorthodox fashion after measuring
and then drawing the design on the headstock with a pencil. I wrapped the
neck in two thick beach towels and placed it on the coffee table with the
headstock sticking off the end. I then placed a pillow on top of the towels.
Finally I asked my ten year old daughter to sit on the pillow while daddy
cut. Off course I put newspaper down on the carpet to catch the sawdust,
after all I was doing this in the living room.
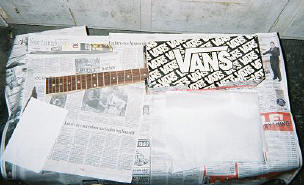
It took some ingenuity to get the painting done, but I found a way. I used
Dupli-Color White from Auto-Zone. Out in my shed it is dusty, drafty, and
the occasional cockroach comes crawling through. I even had a carpenter bee
problem a couple of months ago. This is North Carolina folks. I placed the
guitar neck on a foot locker and covered it with newspaper. I took an old
shoebox and cut a hole in the side of it so the headstock could be concealed
in the box as the coats of paint were applied to it. The shoebox protected
the fresh paint from dust. For the back of the neck I used Dutch Boy’s spray
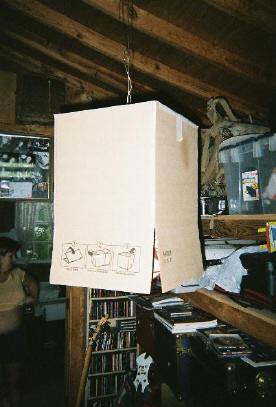
lacquer from K-mart. For the body’s base coats, I used another box and some
wire coat hangers. I hung the guitar body from the hangers, but I also made
a cross section wire an inch above the guitar body. This way I could raise
the box to paint it, and lower it down to protect it while it dried, without
the box ever coming in contact with the wet paint. This proved very easy and
effective as I had to paint the guitar outside and then hang it up inside.
Some advice though, hang up the wet guitar first, then gently and carefully
lower the box down. Don’t move the wet guitar with the box down. This cost
me a coat when the body nudged against the side as I was hanging it.
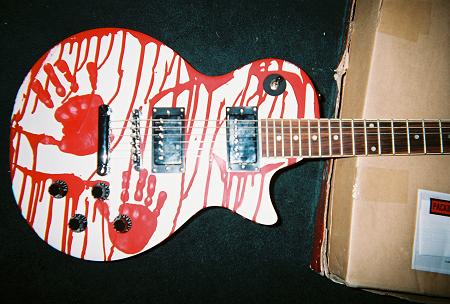
The blood was pretty easy. I used a cheap can of outdoor paint from K-Mart.
This cheap, no brand paint was the reddest I could find and I thought it
would look best against the pure white body color. On the headstock I wet
sanded with 1000 sandpaper. Why didn’t anyone warn me that when you wet
sand, paint comes off?? Well after wet sanding I saw that the headstock was
as smooth as glass, so losing a little paint did not bother me. I was going
to use a paint brush, but I started stirring the paint with a small branch
that I pulled off the tree in the backyard. As I stirred I just figured I’d
use the stick to apply the paint while I was at it. As you can see it drips
beautifully and definitely does not look like paint applied with a brush.
After it dried, I did not want it to lose its look by sanding it, so I just
clear coated it as it was with Dupli-Color clear. I decided to put the SAGA
sticker on the headstock. Why not? After all, it’s a Saga!
Painting the body was fun. My daughters jumped at the chance to have dad
paint their hands red and put them on my new guitar. For the blood streaks I
tried another technique. I just filled a syringe with red paint and ran it
across the body while pushing in the plunger.
(Note: We don't recommend this step! Ed) Lastly. I poked my finger and squeezed out a few drops of blood onto the
headstock and body. Why? Hey, it’s my guitar and no matter what a part of me
will always be with it. Again, I did not sand the ‘blood’ after it dried. I
just clear coated it. I got a real thick clear coat and sanded that with the
1000 paper again. Then I used a little Turtle wax to bring out a gleaming
shine. I suppose this is a little long, but I guess I just wanted to share
this great experience and to let people know that you can build a great
guitar without a ‘standard’ work environment. All it takes is some
imagination!
Now as for the setup, first of all when the instructions say that the neck
pickup has a black and white wire, and in my hand it is a single yellow
wire, I know I’m in trouble. The bridge pickup works fine, I’ll keep it in,
but the neck pickup will be replaced soon. Also I can’t stand those cheap
plastic pots knobs. I’m going to get the skull ones you can order from B.C.
Rich. And yes, like everyone else says, the tuning machines are cheap and
will be upgraded as well.
As far as the action, it is about 90% there. I had to adjust and readjust
the truss rod for what seemed to be forever. It is now good on the upper
frets, but once you get down to the 15th, you need the grip of a gorilla to
get the string to vibrate properly. I’ll keep working on it and eventually
get this thing playing the way it should. Just a question of bridge height I
think.
Looking forward to doing this for a living one day.
Scott
|
 |