|
|
Note from
GuitarAttack: This is a great story. The body was painted
with a roller!
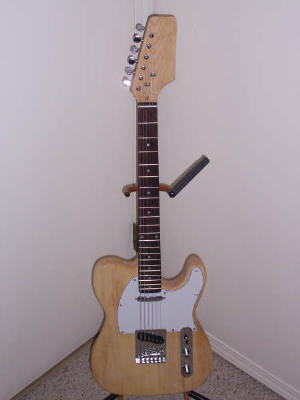
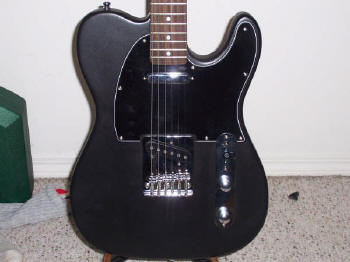
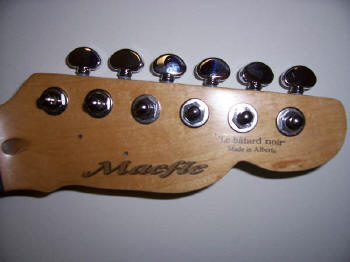
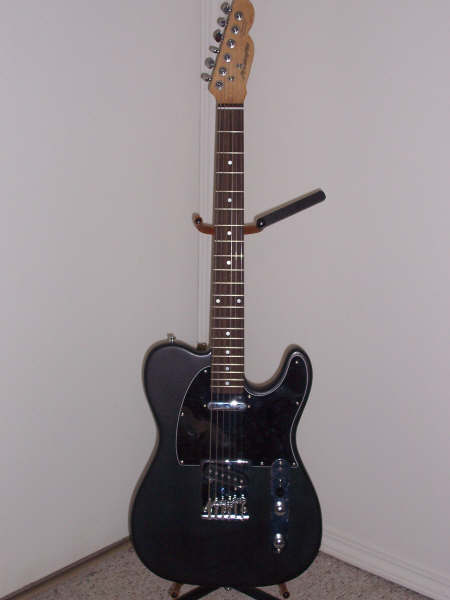
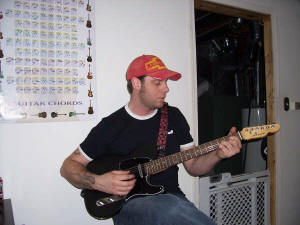
When the whole idea of this build came to mind I figured it would be fairly simple and well, cheap too. I think the major driving force into making it less simple than planned was how long it all took to happen. I ordered the kit near Christmas time and I live in Canada so cross border shipping turned into a 7 week long wait! With 7 weeks on my hands I had all kinds of time to read up on the kits and what to watch for, how to finish it, etcetera. That being said, before I even had the guitar here I had new pickups, new pots, and new tuners. Upon arrival of my kit I wasted no time in getting it out of the box and two hours later I was playing it. Please note with zero setup do not expect much of a factory setup. The most important thing was to see where it needed some, if any, TLC. Well folks, I was lucky. All the holes lined up, it all fit well, however I did make the mistake of not using my new electronics in the pre-fit stage. That would have helped a great deal, but I’ll get to that. "Disassembly and lets get to work", I said. The paint...I knew I was painting it flat black from the start. Combining all the tips I could find, I might note that many good ideas were found at this site and my previous autobody ventures. I went to work. I first sanded the body with 320 grit sandpaper being careful not to sand off all the sealer. Dusted it off completely and started with the paint. Now this whole process may sound a little unorthodox but believe me, it is one killer finish. I used Tremclad paint (like Rustoleum) and rolled it on with a high-density foam roller. With this paint there is no need to prime. After two initial coats I let it sit over night and sanded again the next night first with #0000 steel wool then with 600 and 800 grit sandpaper. I rolled 3 more coats on that night. After letting it sit two nights I sanded it down first with 800 then 1000 then steel wool again then 2000 grit sandpaper. For the last three coats of color I sprayed them with the same paint and then three coats of satin clear. I let them sit for two nights and first I lightly sanded with 2000 again and then went over with, yet again, #0000 steel wool. Some elbow grease and I polished it with polishing compound followed up three coats of Turtle Wax. I know this may sound borderline insane but for flat black, it is one outstanding finish! The neck I kept pretty similar to the Fender Neck, just a tad different shape. I sanded all the sealer off of it and brushed a stain/poly blend on it, two coats the first night. The neck had a couple of runs by the tuning holes by morning that I could see would need to sanded down again. After a light coat on the headstock I applied my waterslide decals a little twisted but I don’t mind. I applied one more coat again by brush a let it dry. After that all I did was rub it down with steel wool. Polish and wax it. Turned out very nice, better than I had hoped. Assembly time. So as I went I saw that there were things I just didn’t like. The switch in particular, so I bought a 4 way mod switch for the new pots and now the option of playing bridge/neck in series was added to the mix. I also replaced all the wires. When I tried out the fit with all the new parts guess what… I needed more room. With the help of my Dremel tool I was able to make the fit work with a one minor scratch under the pickguard. The upgrades were as follows: 1- Fender Samrium Cobalt Noiseless Pickups 2- 4 way mod switch with 250k pots 3- Grover 18:1 tuning machines 5- All new screws 6-Schaller straplocks 6-and I know this sounds weird but I blew cigar smoke into each coat of wet paint for old time sake, seeing as most public places are non smoking now and I wanted to leave my own unique signature on this guitar. (Killer technique. Ed.) After I put it all together with very steady hands I plugged it in and “Good Golly, Miss Molly!!!” She sings! I took it to my guitar guy to change the nut and do a proper setup on it and he was astounded! You’d think that would have made my day, and it did….for about five minutes. A customer of his came in the shop, I had met the guy before, and he started checking it out! He actually offered me some good money for it. Really good money! Sadly I had to turn him down -- this one was spoken for. I am giving this one to a musician friend of mine that I have known about 20 years. But hey, he asked me if I could make him one too, of course I said yes. I already have two more kits here ready to go. I think I’m addicted! Cheers, Matt
Another addict, folks. Rock on, Matt! |
|
||
 |
|||
 |
|||
 |
|||
 |
|||
Great job, Matt -- Keep on building! |
|||
| ATTACK HOME | "SAGA SAGAS" MAIN | ||||||||||||||||||||||||||||||||||||||||||||||||||||
|
|||||||||||||||||||||||||||||||||||||||||||||||||||||