| Note from
GuitarAttack: Here is the kind of story we like to hear.
Pretty ingenious build!! From
Mike Simpson:
Dear Guitar Attack -
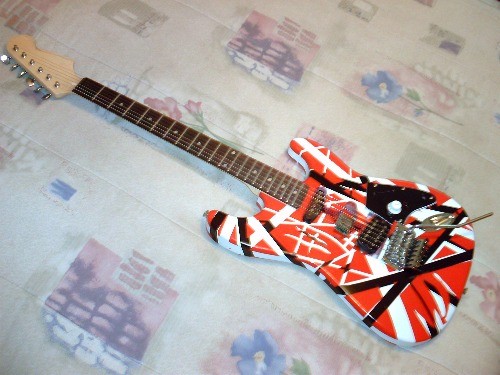
I finally got a picture of my Saga S-Style! I've mentioned this build
in the forum before, and can finally brief you on it! I did this build back
in February/March of this year, and it went surprisingly well, even shooting Duplicolor outside during our unpredictable Buffalo weather.
Since I didn't have to tools, time, and desire to replicate every last inch
of the original, I took a few shortcuts, especially in regard to the neck
and bridge. Here's the dirt:
1. Stock Saga neck - It has a pretty flat radius, and plays well, although
it sits a little high in the pocket. The frets were finished, which was a
good thing. Even though the instructions say the neck is pre-adjusted, this
one wasn't, and required some truss rod adjustment and shimming. I'll swap
it out for a maple/maple neck eventually. I had to replace the nut, which
was cut high and held in with CA glue. The stock tuners are actually very
stable, and I can divebomb without the need for a locking nut!
2. Bridge - I took a Licensed Floyd Rose II from another guitar to use on
this build. Because the neck is a little high as I mentioned, I can't get
the bridge to sit flush with the top. However, I found a 1971 quarter that
I'm going to use in the same way as the original to remedy the problem.
Using 3 springs, it's easy to dive, and comes back in tune perfectly every
time, like I noted above. This was completely unexpected, and saved me the
aggravation of routing out a shelf for a locking nut!
3. Pickups - The pickups came from the same guitar I took the Floyd from.
The neck pickup is a dummy like in the original. For the bridge pickup, I
built a shelf to mount it on, similar to the black/white version built by
Guitar Attack. They're both no-name pickups, and I have no idea as to
impedance, etc. The bridge pickup only had two leads, which made wiring
easy. I made sure to use the Tone knob from the kit, and cut the pickguard
to size using the January Guitar World article about the Fender replica as a
guide.
4. Body - Some of the biggest hack jobs I've seen have been done with a
chisel, but for lack of a router I used a combination of chisel and a Dremel
to enlarge the pickup routs. If you're careful, it works really well. Came
out fine for me. I fit the neck and strung up both E strings to line up the
bridge, and gave myself a little extra scale length to ensure good
intonation. I had to enlarge the tremolo rout in order to do so.
5. Finish - Testor's black enamel for the formerly white pickguard,
Duplicolor red, white, and black for the body. I used the same Guitar World
article as a guide for the striping. Standard masking tape was used, I cut
it into 1/8" strips for the narrower stripes. Because the body is not the
exact same shape and size, I had to fudge a little on the sides and
back...ok, I had to fudge a lot, but I was more concerned with the look of
the front. :) I painted right over the foot-thick sanding sealer on the
body, which I may regret as the paint wears.
Overall, it went together very well. It plays well and sounds good. The
overdrive fades to a decent clean sound when you back off the volume, and I
can't say enough how surprised I am with the tuning stability! I recently
switched to a very light string guage, which resulted in having to do a
complete setup. I think it's lost some tone, and sounds a lot thinner as a
result. I'll be switching back to either regular or Hybrid Slinkies, which
should improve the sound greatly.
After the project, I found myself with some Saga pickups and a bridge left
over, as well as a guitar missing some pickups and a bridge....which
resulted in another build. I'll send a picture and the details soon!
-Mike
|