|
We have been posting Saga Sagas -- stories about
building Saga guitar kits -- for a number
of years. We have decided to post this page of important "lessons learned" for new
builders before they dive in to building their Saga kits. We ask all of you
to chime in and email your lessons.
SAGA kits are an
incredible bargain! You get everything you need to build a
playable guitar for usually under $100 for S or T style kits. If you bought
the parts individually, your total cost will be in the $375 to $400 range.
Here are our top lessons:
1. Do a complete inventory of the parts when you first open the box.
Make sure everything is there before you start. Get some Ziplock bags
to keep track of everything. There are small parts in the box which
are very easy to misplace.
2. Put the guitar together and make sure it plays before you put a finish on
it. This includes testing the pickups
and electronics. Yes, you may have to drill and insert the posts on
LP-style guitars, but this will likely save you lots of work and repair in the
future.
3. Practice your finishing skills on scrap wood before you finish your guitar.
Practicing your spray paint technique is critical!
4. Do not be afraid to strip the finish and try again. That is why you
buy a kit. Get it right.
5. Be prepared to replace the tuners and control pots on your build. These are
probably the two
weakest links on the current kits.
6. All Saga kits have a thick, near bullet-proof sealer on the body which may have to be
sanded-off prior to staining. You can try chemical strippers but we've
found that they are generally ineffective. Heat guns have been
effective, but use them at your own risk. It is VERY difficult to get
a great outcome on staining these pre-sealed bodies - we recommend painting
your body with a solid color or tinted-clearcoat on your first attempt.
7.
Take your
time-- if you get frustrated, walk away and come back to
it later after you have cooled off. Nothing is worse than getting upset,
rushing a step, and
really messing it up.
8.
I always tell people to look at building a guitar as a series of individual
steps, each of which must be done as perfectly as possible. Take your time,
do some analysis, and take breaks!
9 . Before you apply a finish - whether lacquer, poly, tung oil, etc - I recommend wiping the guitar body and/or neck first with
naphtha (lighter fluid) then with mineral spirits -- both are available in
the paint sections of discount stores.
This will remove grease and other "stuff" which may keep your finish from
sticking properly.
You can use paper towels, but do not mix cleaners on the same towel. Use a
towel for naphtha then throw it away. Use a clean towel for the mineral
spirits. Once dry, use a tack cloth or compressed air to remove any lint on
the parts.
Once it is clean, don't get your dirty fingers on it before your finish goes
on.
Caution: Both substances are flammable! They will burn! Dispose of the
towels properly.
10. I recommend using a good quality set of strings on the
guitar, particularly during setup. The ones supplied with the kit are not
the best and I am not even sure what gauge they are.
We always use Ernie Ball Pink Slinkys (.009) on our electrics, but we are
not official endorsers!
11. Make sure when replacing the parts which came with your kit with
aftermarket parts you measure carefully, and that you check the size of the
replacement parts......and then measure them again....and then one last time
for good measure before ordering the parts! I would say that just
because it is labeled "jazz bass", Telecaster, or whatever does not mean it
matches exactly the dimensions of the original model it is trying to
replicate nor will it necessarily fit on your Saga.
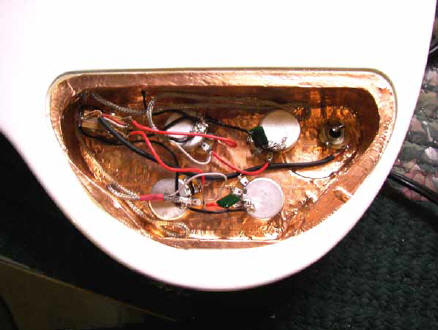
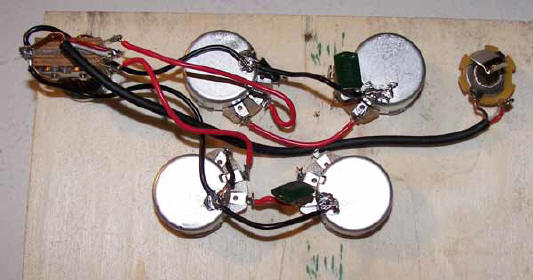
12. Don't forget to install the ground wire from the bridge to the electronics.
I can't tell you how many Saga builders I've received email from because
their guitars just "wouldn't quit buzzing"!
It is best to check the ground with a volt-ohm meter before you put strings
on the guitar during assembly. This will potentially save you a lot of work.
13. Use a little wax or fret board oil on
the screw threads before you start bearing down on that tuner or pickguard
screw. Bee's wax on the threads really helps to reduce the chance of
breaking the screws off in the wood. In a pinch regular candle wax
works well, too.
14. When soldering, don't forget to rough-up the pots with some sand paper at
the point
where you are going to solder. Also use a little solder on the tip of the
soldering iron before you solder the wire. It helps the solder to flow
better.
|
| 16.
Take photos of the guitar build in progress. Keep your phone handy during
the build to snap "reminders". This will help you reassemble it or
make changes later. You can also share them with us. We are
particularly interested in "ah ha" moments during your build, and you
should be, too. 17. For
LP-Style Guitars in particular: Temporarily bolt on the neck, place
the bridge, and carefully measure the scale length. To do this,
measure the distance from the bridge-side of the nut to the center of the
12th fret and double it. LPs are normally 24 3/4"; S and T Styles
are normally 25 1/2". This will allow you to ensure the adjustments
are correct. A reader told us that he did place and check all of the
parts for fit before beginning, but did not measure the scale length.
If he had, he would have filled the holes with a wooden dowel and
redrilled new ones a bit lower.
If you look at a picture of either a Gibson
or Epiphone LP Jr, you will see anywhere from 1/4 inch to 5/8 between the
upper portion of the bridge assembly and the lower edge of the pickup
housing - the the Saga kit he built was only about 1/8 of an inch, leaving
far too little room for adjustment purposes. He ran through several
options but the only sure one is to redrill the bridge holes.
|