|
BUILDING A SAGA J-BASS |
|
BUILDING A SAGA J-BASS |
| Note from
GuitarAttack: This is a great story. Well-written and
informative. From Chris Plumridge
|
 |
|
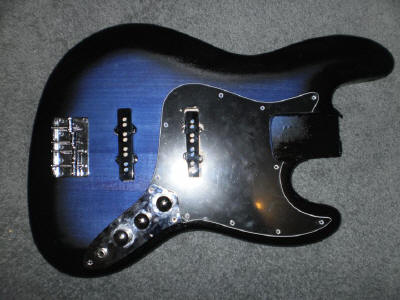
I'd been eyeing off a MusicMan bass with a blue burst finish, but I've
always wanted a Jazz bass, so I figured I'd try my Jazz with a blue burst
as well. I wanted to stain rather than paint so the woodgrain would come
through, too. And while I never really regretted that decision, it did
take an awful lot of work to get that bloody sealer off! Two things with
that, though: If you plan on doing what I did and sanding through to the
timber, then PLEASE wear a mask. This stuff makes a huge amount of really
very fine dust. Seriously, it's like talcum powder and hangs in the air for ages. You don't want that stuff in your lungs. Secondly, use a power sander! Otherwise you'll be there for years, cause the stuff is bombproof. After a good couple of days with the power sander mine was ready for some colour! Nice little trick that I learnt from a few people on the forums was to mix up a nice, dark version of your stain and give it a nice thin coat first up. Wait for it to dry and then sand it back. The stain penetrates the less dense bits of woodgrain first and deeper than the rest. Once you sand it back, it'll have a nice tiger-stripe effect and highlight the grain of the wood really nicely. Go over it again with the stain, and the dark areas will become darker while the rest of the stain fills the rest with the final colour. Once that had happened and I was happy with the colour, it was time for the black shadow around the outside. The way I attacked that was with the 'poor man's sunburst' method, and I strongly advocate practicing this first. Better photos and descriptions do exist on this website, but here's my description: A cardboard (well, I used 3mm MDF) cutout slightly smaller than the outline of the guitar body is put on risers a couple of centimetres above the guitar. You spray paint into the gap between the stencil and the guitar itself, and it makes a nice graduated fade. Experiment with the angle of the spray, size of the stencil, and height of the risers to control the fade (on scrap wood obviously!). Only thing that stuffed me up was the edges. I was painting on a table covered with a plastic drop sheet, and the automotive lacquer that I was using is designed to melt into itself between coats. Well, I know that NOW, anyway! So once I'd sanded off the lumps of paint that had transferred their wrinkly disgustingness from my table to my bass, I was ready for clear coat and sanding! |
 |
|
Electronics all got re-soldered and the cavities lined with copper foil.
Still hums like anything, though. Guitar Shop Man said it was the front
pickup, but I think it's an earthing issue (hums less when I touch metal.
Note to self: take to a better Guitar Shop Man...). The blend pot is a
substitute for the original electronics, now instead of volume, volume,
tone, I have it set up as master volume, blend, tone, meaning that I can
now cut the volume really easily if I'm playing in church and don't want
to be making rumbling/thumping noises during the prayers (kind of
embarrassing!). As for the neck and headstock, neck is stained black and then coated with an estapol furniture satin to keep a really fast matt feel (I hate shiny necks!). This is matched to a black faced headstock and custom decal. After all the hand-fitting I had to do, it's not like I was going to put the Saga decal on it, was I?! Decided on a custom decal a guy on eBay printed up for me (I can't print in white). Decal lines don't show behind the lacquer- perfect. Overall, I'm really pleased with how it turned out. After a good setup by Guitar Shop Man, the thing plays really nicely and it's been a whole 11 months of faithful, awesome-sounding bass action. It taught me a lot and I love being able to jam with it knowing that I was responsible for everything from beginning to end. It'll never be perfect, but it sounds damn cool, and it's MINE! This was my first Saga kit, and it sure won't be my last. I hope that this goes on to encourage a few more people to take the plunge as well. It's worth it! |
|
| Great job, Chris -- Keep on building and send us more photos! | |
| ATTACK HOME | "SAGA SAGAS" MAIN | ||||||||||||||||||||||||||||||||||||||||||||||||||||
|
|||||||||||||||||||||||||||||||||||||||||||||||||||||