|
REPAIRING AN OVATION ACOUSTIC |
|
REPAIRING AN OVATION ACOUSTIC |
|
From our friend Dave Slusser in PA, USA Great work, Dave. A
very cool story! Hi gang.. I’ve been away for awhile, but it’s great to be back on GuitarAttack. Here’s a little set of “ turnbuckle jack clamps ” I designed for a time consuming and aggravating job I took on a few months ago. As always, before you take on a repair job, be certain you know you abilities and limitations. Also, I make no claims of success with these clamps, or the process. It worked for me; I hope it works for you. Safety Note: If you try this procedure, make sure you understand that it is irreversible, and it is very easy to destroy a good guitar. Make sure you take your time and keep safety front and center. If you have any doubts about your ability, or you are afraid of rendering your guitar unplayable, please see a qualified luthier or repairer. |
|
|
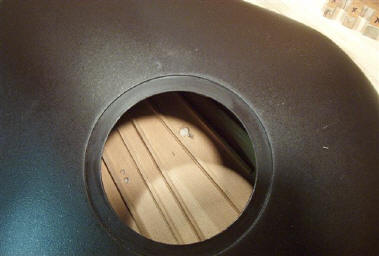
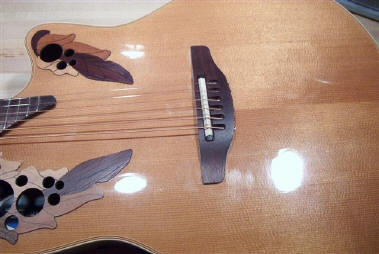
Recently I was asked to do a repair job on a 2002 Ovation Elite, Model 1868. The bridge had torn off and I was at a loss for why?/. Regardless, I said I would “ try “ and do the repair. A number of repair shops were asked, but all refused the job. The first pitfall was the fact that the Elite does not have a sound hole as we know it, the normal round one located just beyond the heel of the neck. The Ovation Elite has what I refer to as a “ Grape Cluster “ sound hole configuration. A small grouping of holes in the top and bottom bouts, at the front end of the body. So.. the normal way of clamping the bridge for repair with “C” clamps was out of the question.
|
|
|
Since I couldn’t clamp “ together ”, I needed to clamp with pressure, rather than squeeze. I have a veneer press that I use for some work, but the slight contour of the guitar top wouldn’t allow for just using that. If I did, the center of the bridge would be the only area to get pressure, not to mention that I would cave in the top with just pressure from above. This required some sort of inside support of the top. As I said, there was no sound hole. Ovation did however, have a 4 inch diameter access hole in the rear of the guitar, directly beneath the bridge for accessing electronics.
|
|
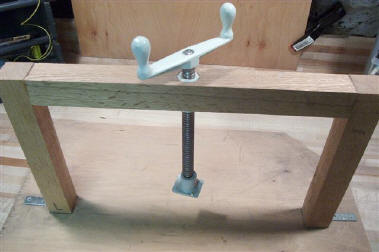
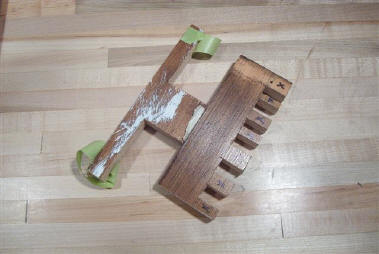
| So I came up with a
two-part support caul ( not real
pretty, but effective ) that would fit between the braces and support just
the top, while making sure that there was NO pressure on the braces.
I had to make it in two pieces so I could get it through the hole, then with double sided carpet tape, I reattached the two pieces. I needed some sort of an “ expandable jack ” type clamp. I looked at www.stewmac.com and found a “ scissor jack ”, but to do the repair and make any profit at all, meant the price for one was waaaaay out of the question, not to mention that I needed two !! So I started thinking about how to make a scissors style jack clamp, “ cheap.” I’m certain that the idea I came up with isn’t original, but my design may be. |
|
 |
|
|
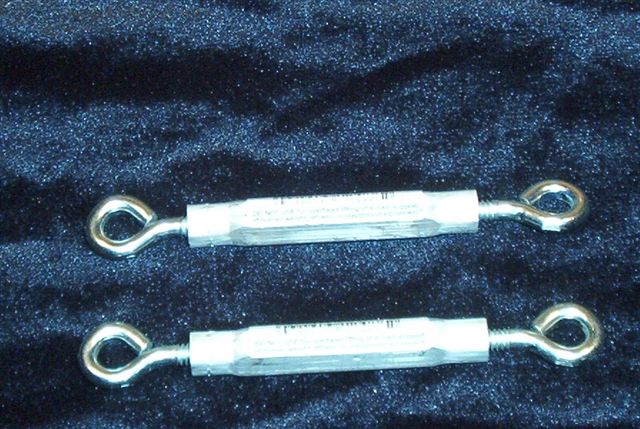
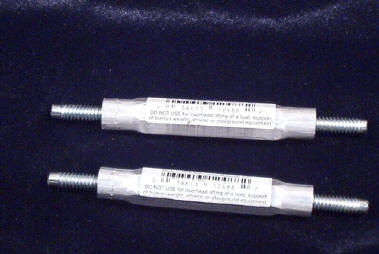
I went to the local hardware store and bought two screen door turnbuckles for $1.79 ea. plus tax, and took them back to the shop. Next, I used a hacksaw to cut off the “ eyes ” from each end, and ground them as smooth and slightly rounded as possible, leaving as much unthreaded rod as I could. |
|
|
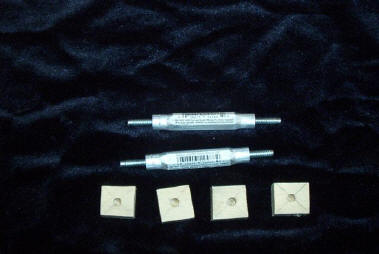
Then I cut four small pieces of 3/8” thick plywood 1” square and drilled a hole ( roughly ) in the center of each, being careful to only go about half way through.. Make the hole about .015” bigger than the diameter of the rod on the end of the screw where you just cut off the eyes. This allows for some “ wiggle room ” when clamping non-parallel surfaces. Next I inserted the caul through the access hole, lining it up between the braces, and directly under the bridge area of the top, and taped it in place so it couldn’t move during the centering in the Veneer Press. Next, I applied Masking tape just over the glue area edges of where the bridge sets on top, realigned the bridge, and with a XActo Knife, I carefully and shallowly cut through JUST the tape around the bridge, then removed the bridge, and pulled off the tape that was under the bridge area. This process will keep the glue from running over the top of the guitar, and making it a Bear of a job to remove without damaging the guitar top once the glue has dried. Now, on to the actual gluing part. |
  |
| At this point, I guess I
should tell you that this was my THIRD attempt !!!! My process was
absolutely sound, it was the glue. The first two times, I used the glue that
is always selected for this type of repair, Titebond ll. That’s generally
the weapon of choice for bridge replacement on acoustic guitars. Some people
prefer Hot Hide Glue, I find it a bit of a pain to work with due to having
to the mess of a heat pot, and cleaning up all the utensils and containers
after the job.
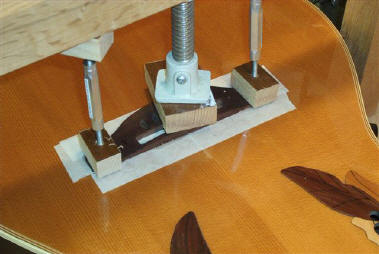
So, as I said, for some weird reason, the Titebond ll would NOT stick to the wood top on this guitar, even though I cleaned it methodically. Each time I completed the process, it appeared to be mending well. The first time I followed the time on the bottle and let it set up for 30 minutes and did not disturb the joint or remove the clamps for 24 hours. I strung it up, tuned it, played it, and it looked and sounded great ! The next morning the bridge had ripped off again ?? So I diligently cleaned off ALL traces of glue… AGAIN, and tried it over. This time I left it in the clamp setup for 48 hours. Same as before.. Strung it, tuned it, played it, sounded and looked great. Less than 24 hours later, ripped off again ! After a week or two of researching it and thinking it over, I decided to go with Devcon 15 Minute Epoxy. I’d used it for all kinds of things, and it had never let me down. As you can see, this is how the final clamping assembly looked as the Epoxy set up. Also, you can see, I’ve used slightly larger pieces of wood to compensate for the distance between the guitar top, and the inside of the frame on my veneer press. You’ll need to alter the size of the wood blocks when the distance is larger than the overall expansion of the turnbuckles. The turnbuckles do come in larger and smaller sizes, the average is about a 2” overall total travel. This means that the smallest size ( completely screwed in ) to the largest size ( completely screwed out ) will only change by 2” roughly, depending on the size of the turnbuckles. So you’ll need to make up the desired difference with the wood. The actual veneer press hand wheel in the photo is only holding some very slight pressure on the center, just to be sure there IS some solid contact, and nothing moves.. |
|
| As you can see, the repair is good. It’s been three days and there’s no signs of the glue joint failing. It’s under tension, tuned, plays great, and hasn’t changed pitch in 3 days. I sure hope the owner likes the job? Even though I lost my butt on it, I’m still happy that I was successful on a job no one else would do.. |
|
|
Rock On: Dave Slusser UPDATE: Hello guys, just an update. I delivered the completed Ovation to the owner, she was ecstatic!!! She said the work looked great , and that she couldn’t even tell that I had made any repairs. She also said that I came highly recommended?? I didn’t ask by whom. But those are the kinds of comments that make it all worth it. Bottom line, I succeeded where others would not make the attempt, and that’s the reward for me. Happy building,,.and repairing.
|
|
| ATTACK HOME | REPAIR PAGE | ||||||||||||||||||||||||||||||||||||||||||||||||||||
|
|||||||||||||||||||||||||||||||||||||||||||||||||||||