|
Hey Guitarattack...I just got a new Strat-style guitar from
“Musicians Friend” How do I “set it up”? It buzzes and when I play chords up
the neck, it sounds out of tune....but it was cheap. Help! When we
get these notes, it is always difficult to explain that every guitar is
different and getting our favorite wooden contraptions playing right
requires some analysis and thought. You may have some high frets, an
excessively bowed neck, improper neck angle, or a combination of all of
these and more. Before throwing in the towel, I recommend adjusting
everything you can before doing more serious work.
WARNING: You may do serious damage to your
guitar or hurt yourself if you improperly apply the techniques presented here.
If you are unfamiliar with guitars, tools, and general mechanical
principles, I recommend taking your guitar to a good repairperson (luthier). As always,
repairing your guitar is at your own risk! Be careful out there.
Step One: Install a new set of strings on your
guitar. I always install Ernie Ball Slinkys, either 9s or 10s, depending on
the preference of the player. Over the years, these strings have been
extremely consistent, and they feel good to play on. With the strings off,
make sure you clean around the pickups and wipe the neck down. A dry cloth
is fine – make sure it is 100% cotton or MicroFibre. Don’t use anything with
polyester on the guitar – it will probably scratch the finish.
Step Two: When you have your guitar strung up and tuned, you need to
check the curvature of the neck. You may see on other websites that a gap of
1/64” (0.015625) - 1/32” (0.03125) is required…so what does that look like,
especially if you don’t have an engineer's rule or other measuring device? A
standard credit/debit card is about .025”, or 1/40”, and standard business card is
about .0125”, or 1/80”. You can probably find these two things in your
wallet or purse. Get them out and have them handy.
Pick up your guitar and hold it in the playing position. Put a capo or small
clamp on the first fret (closest to the nut) to hold the low E string down. The
string needs to be contacting the first metal fret. You can also have a
friend hold down the low E string. Next, with your picking hand, hold down
the low E string at the 17th fret. As you can see, the string forms a
straight edge between the first and 17th frets.
There should be a slight gap between the E string and the 9th fret. If not,
your neck has “back bow”, which we’ll address later. Still holding the
string down, use your free hand and try to slide the business card under the
E string right on top of the 9th fret. If it slides under the string without
contact, try the credit card. If the credit card slides in without contact,
try the two cards together. If this doesn’t make contact, your neck needs
some work! Ideally, the business card should clear the string, but the
credit card shouldn’t. If the credit card clears the fret and string with
ease, we have some “bow”, or relief in the neck.
On most guitars, the same rule for trussrods holds true: Right is tight,
left is loose. Looking at the truss rod adjustment on top of the neck near
the tuners, the right/left arrangement is from the top of the neck looking
toward the body of the guitar. If you have back bow, you need to loosen the
truss rod, or turn the nut on the trussrod left. If you have bow, you need
to tighten the truss rod, or turn the nut on the trussrod right.
As a technique, I always loosen the trussrod before I do any adjustment. If
you start cranking the truss rod down, and it is already pretty tight, you
may break it, and this is something you won't be able to fix at home in an
afternoon. If you feel the least bit uncomfortable at this point, take your
guitar to a repairperson/luthier.
There are generally two types of adjusters on truss rods: A nut for Gibson
style trussrods, and a hex-head screw for just about everything else. The hex-head is most common on import
guitars. Make sure the hex-head driver that came with your guitar is well
seated – you don’t want to strip it out, or your have trouble on your hands.
Generally about a Ľ turn is enough to move the neck. If you move it more
than a half turn without movement, you may have an issue.
Step Three: Check string height at the nut.
A lot of the nut-work on import guitars leaves something to be desired. To
check the height of the nut, start at the low E string, and fret it on the
third fret (a “G” note). The string should be sitting on the first fret, or
just above it. When I say “just above”, I mean close enough just to see some
light through the gap between the string and the fret. Try holding the
string down on the third fret and "tap" the string above the first fret,
kind of like checking the neck relief. You should be able to press the
string down just ever so slightly onto the first fret.
Try this procedure for all of the strings. If there is
a big gap, your nut needs some work. Can you fix this? You can if you have
some nut files. If you don’t you may need a repairperson to take a look at
it for you. The height at the nut is critical to a good playing
guitar. If it is too high, the string will be too low at the 12th fret,
probably causing a nasty buzz and intonation problems.
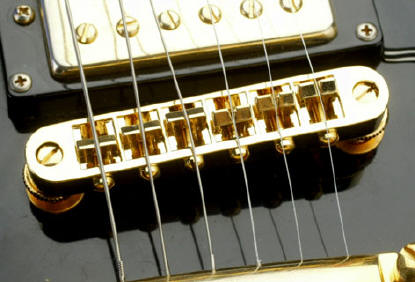
Before you continue, take a look at your bridge --
we're heading there next. If you look at both bridges pictured below, you can see
that the saddles on both are arranged similarly, with an adjustable saddle
for each string.
Gibson-style Bridge
This bridge has six individually-adjustable saddles which are adjusted
using the screws you can see at the bottom of the bridge facing the stop
tailpiece. The screws have a slot head, requiring a flat-head
screwdriver. On some guitars these screws face the other way (usually on
the older or replica models). We see them set up both ways.
If you have to adjust a saddle, place a soft cloth
below where you're going to insert the tip of the screwdriver. This will
help you avoid gouging the top of your guitar if you slip. Turn the
screw clockwise to move the saddle back and counterclockwise to move it
forward. Make small turns because a little turn can make a lot of
difference.
|
|
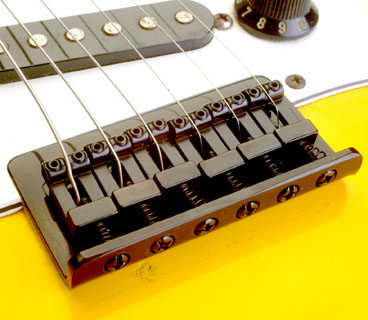
| Fender-style Bridge Although the
Fender bridge looks different, the principles of setting the intonation
are exactly the same as a Gibson bridge. You move the saddles with an
adjustment screw (in this case, a Phillips head screw) until the note at
the 12th fret and the open string are the same.
Note: If these saddles are in a straight line, the guitar is probably
not set up properly! |
|
Step Four: Set the approximate positions of the string saddles on the
bridge.
First, determine the scale of your guitar. Measure from the body-side of the
nut to precisely over the 12th Fret. If you double this measurement, you
have the scale of your guitar.
Using the distance from the nut to the 12th fret (we’ll call this
measurement “x”), measure from the 12th fret to the bridge. Using the screws
on the back of the saddle, set the individual saddles to the following
specs:
Note: I find it is easier to make the initial
adjustments with the strings loosened. Once you set the saddles, tune
the guitar back to pitch.
| |
Low E: |
1/8” longer than X |
| |
A: |
1/16” longer than X |
| |
D: |
1/32” longer than X |
| |
G: |
1/8” longer than X |
| |
B: |
1/16” longer than X |
| |
High E: |
1/32” longer than X |
We get the final settings once we get our saddle height, but this will get
us close. The saddles should have a general orientation like the
bridges in the photos above.
Step Five: Set string height at saddles.
Measure at the twelfth fret and set saddles so the height between the bottom
of the low E string and the top of the twelfth fret is about 1/16". The
High E should set just at 1/16”, or about two credit card widths above the
12th fret (we know you have at least two). The other strings should be the
same height, following the curvature of the fretboard. This is easy with
the Gibson bridge -- just crank it up and down, and the shape of the bridge
conforms to the fingerboard in most cases. The Fender-style bridge has
more adjustment range, and it may take a little more time to set it up.
Remember – This is a starting point to get your saddles set. Your playing
style may make you either raise or lower the saddles. We’re just trying to
get in the ballpark.
When you complete this, the saddles on your bridge
should be somewhere in the middle of their adjustment range. If they are
sitting flush on the body, or maxed out, your neck angle needs to be
adjusted, and we recommend letting a qualified repairperson complete this
job (another article is on the way).
Step Six: Fine tune the intonation setting with a tuner.
What we are going to do here is actually adjust the
length of each string. This is the only way to make sure your guitar will
play in tune all the way up the neck.
You’ll need an electronic tuner for this job. If you don’t have one, you can
find some pretty cool ones for your computer…just plug it into the sound
card and start tuning. You’ll need some small screwdrivers --flat tip or
Phillips, depending on your bridge.
Follow these steps:
| |
1. Hold the guitar in the playing position.
|
| |
2. Hook up the electronic tuner and put it in a position where you can see
it clearly. You can use a clip-on, but they don't seem as accurate for
intonation. Also be aware that there are some great tuner apps
that are extremely accurate. The Peterson app on the iPhone is our
favorite.
|
| |
3. Tune the entire guitar. Make sure you take your time and get it as
precise as possible.
|
| |
4. Start with the low E string. Play the string
with a pick, and make sure it is in
tune. Next, fret the string at the 12th fret, play the string, and check
the tuning. It should show an E in tune.
|
| |
5. If the note played at the 12th Fret is in tune like the open string, the
string is properly intonated. If is isn’t continue to step 6.
|
| |
6. If the note played at the 12th Fret is flat (below E), take your
screwdriver and move the saddle toward the pickups. If the note was sharp
(Above E), move the saddle away from the pickups. The
General Rule: Flat = Forward
|
| |
7. Continue this process until the open string and that same string fretted
at the 12th fret are in perfect tune with each other.
|
| |
8. Continue this process for all strings, and keep going back and checking
the settings for each one. |
When do you set the intonation?
I always check the intonation when I change strings or suspect the
intonation is out. Guitars are very susceptible to changes in temperature
and humidity and this may cause some need for adjusting the intonation. If
you keep your guitar in a case in an environment which has a constant
temperature and use the same gauge and brand of string you may hardly ever
need to adjust the intonation.
Good Luck, and keep checking back for more articles.
|
