We at GuitarAttack support the Boy Scouts of American wholeheartedly.
We've spent years in the program, and one of our favorite Scout endeavors is
the Pinewood Derby. While this is not guitar repair, you can probably
learn some things from the techniques I use to repair the car that are
applicable to guitars. The bottom line is that this is a really
important repair.
|
| Step 1:
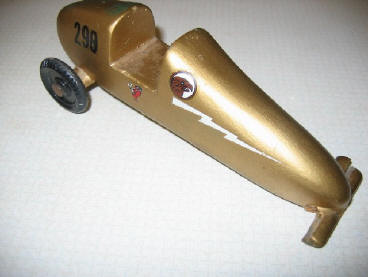
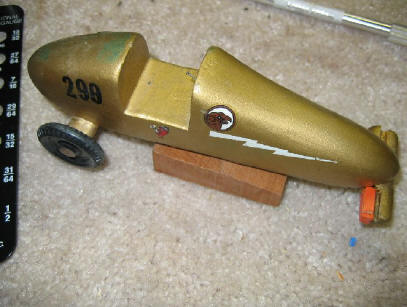
The Patient My father and I built this Pinewood
Derby car in 1970 when we were living in Leavenworth, Kansas. It was
our first Pinewood Derby car, and I remember my Dad taking the kit to the
wood shop on Fort Leavenworth for some help. We didn't have anything
bigger than basic hand tools at home, and he wanted to ensure it looked
cool.
The challenge was that somewhere during the countless moves I've been through
since 1970 this car got damaged and the original front wheels were lost.
Recently a little boy across the street, who is an
active Tiger Cub, had to build a Pinewood Derby car while his Dad was away
on a business trip. The little boy's mother approached me to help with
the project, and I was too willing to help. I believe if you spend some
time with kids it will pay off with their character and citizenship.
The time we spent with the little guy's Pinewood Derby
car got us thinking -- could we repair our original 1970 car?
|
 |
 |
| Step 2:
The Donor Where in the world could we find some
original thin wheels? The kits sold today have much thicker wheels
which clearly don't have a vintage appearance.
The answer? eBay, of course.
I found this early 70's rig on eBay, and wound up
paying about $12 for it. There is something sad about this -- selling
a part of your childhood for a lousy twelve bucks. The key pieces I
needed from the donor was a wooden axle, two nails (axles), and two wheels.
This one actually came with three functioning wheels and one broken one.
The piece of the axle near the rear of the car would come in handy.
Note how the nail holds the wheel on the car.
The car arrived in about five days, and we got to
work.
|
 |
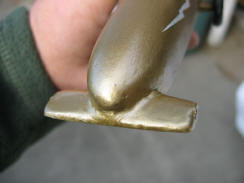
| Step 3:
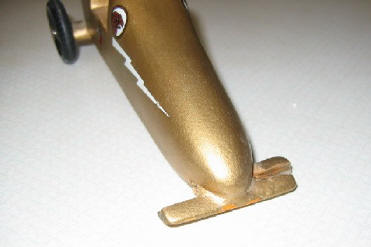
Repair the Front Axle You can refer to Step 1
and see what looks like a poorly-done repair on the axle. We pried the
remaining piece on the left side of the car off and decided to try to use
it. We used the partial axle from the eBay car to repair the right
side of the axle. Using an Exacto knife and thick CA glue, we started
piecing the axle back together.
We wanted to retain as much of the original paint as
possible, but, like our guitar repairs, wanted to make it virtually
invisible.
Note: The council was so big at Fort Leavenworth
that boys were assigned numbers for the cars before the race. Mine was
298, and this was in the days before decal film and computers! My Dad
made number 299 into 298 with a black magic marker!
|
 |
| Step
4: Shape and Grind
When the glue was dry and we felt pretty good about
the structural repairs, we did some creative work with our Famowood wood
filler. The original car had axles with smooth tops, and you can see
how the back axles look in Step 1 above. We used some tape to build a
"roof" for the cavities for the nails which hold the wheels on. Next
we spread on several coats of wood filler.
Once the wood filler was completely dry, we shaped the
axle with a Dremel tool. We used a medium sanding drum and shaped by
eyeball. When the shaping was complete, we used water thin CA glue to
make the wood filler as hard as a rock. We squirted it both inside and
outside the nail cavity, and made sure it dried smooth.
|
 |
| Step
5: Prep for Paint
Once the shaping was complete and the CA glue was dry,
we primed the exposed parts with BINS primer. The main reason we used
BINS was to ensure paint compatibility between the CA glue, the old paint,
the filler, and everything else on the car. Here is a shot of the car
with the BINS sprayed. What you can't see is that we primed the bottom
of the front axle as well. |
|
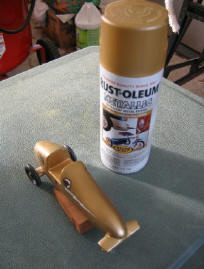
Step
6: What Paint Shall We Use?
I had originally thought that I would use some
leftover ReRanch Goldtop Gold I had in the paint locker, but I couldn't get
it to spray. So, it was off to the store to look around.
I don't remember the kind of paint we used, but it was
probably from a hardware store being that we had used sandpaper and wood
filler on the car. I went to Lowe's and found this Rust-oleum Metallic
Gold paint, and I thought it looked pretty good. I bought this can and
sprayed some test coats on some scrap. The match turned out pretty
good.
Here is a shot of the first couple of coats drying on
the car. You can see that the distant match is pretty darn close. |
|
Step
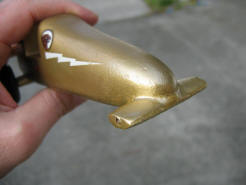
7: How does it look close-up?
Here are a few shots of the touch-up in progress.
These photos represent a couple of coats with no "aging". While the
match isn't precisely correct, it sure looks better than having that smashed
axle!
I continued to spray coats, and aged the finish with a
little graphite to take the shiny edge off. I rubbed it on my finger
and rubbed it into the finish to make it a little dull. I also cleaned
up the rest of the car with some Turtle Wax white polishing compound to make
it a little more shiny and better match the new paint.
|
|
|
|
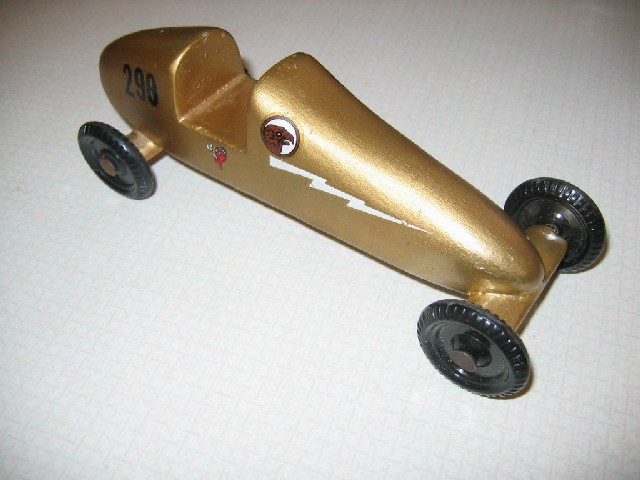
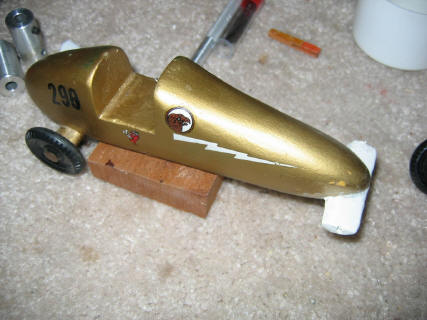
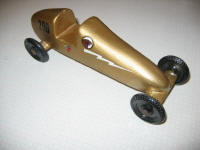
Mission Complete!
Here is a shot of the finished repair with the vintage
wheels in place. I aged the nails (axles) to make them look more like
the ones on the back. It just took a little bit of Radio Shack etching
solution to get some oxidation on the nail heads. Click on the photo
to see a large scale version.
I am very proud of this car and the repair, and it was
well worth the effort to get the car back the way I remember it. Hey
-- take the time to preserve those memories!
|
 |
| |
Back to Top |